Texture Editingfor the Vixine

For the sake of having options, I’ve set up the model with three methods of editing your Vix, depending on your available software and technical comfort level! Official add-on skins are also compatible with this system, and I’ll include instructions at the end of this page (eventually) for skin-makers to include it in theirs!

1: Using the Hue and RGB mask-based textures in Unity
2: Editing in Substance Painter* (Best results!)
3: Editing in Photoshop (Your mileage may vary, but it’s an option)

*The substance file was saved using an up-to-date adobe subscription copy of substance. Steam’s version is often behind on updates and the substance file downloaded from your purchase may not be compatible. However, I’ve included several key files that you can import into a fresh substance file using the FBX that comes in the .unityasset, granting you the AO and various textured parts like nose/ear/beans skin, so all you need to do is paint your fur pattern still. I’ll also provide instructions for this process!
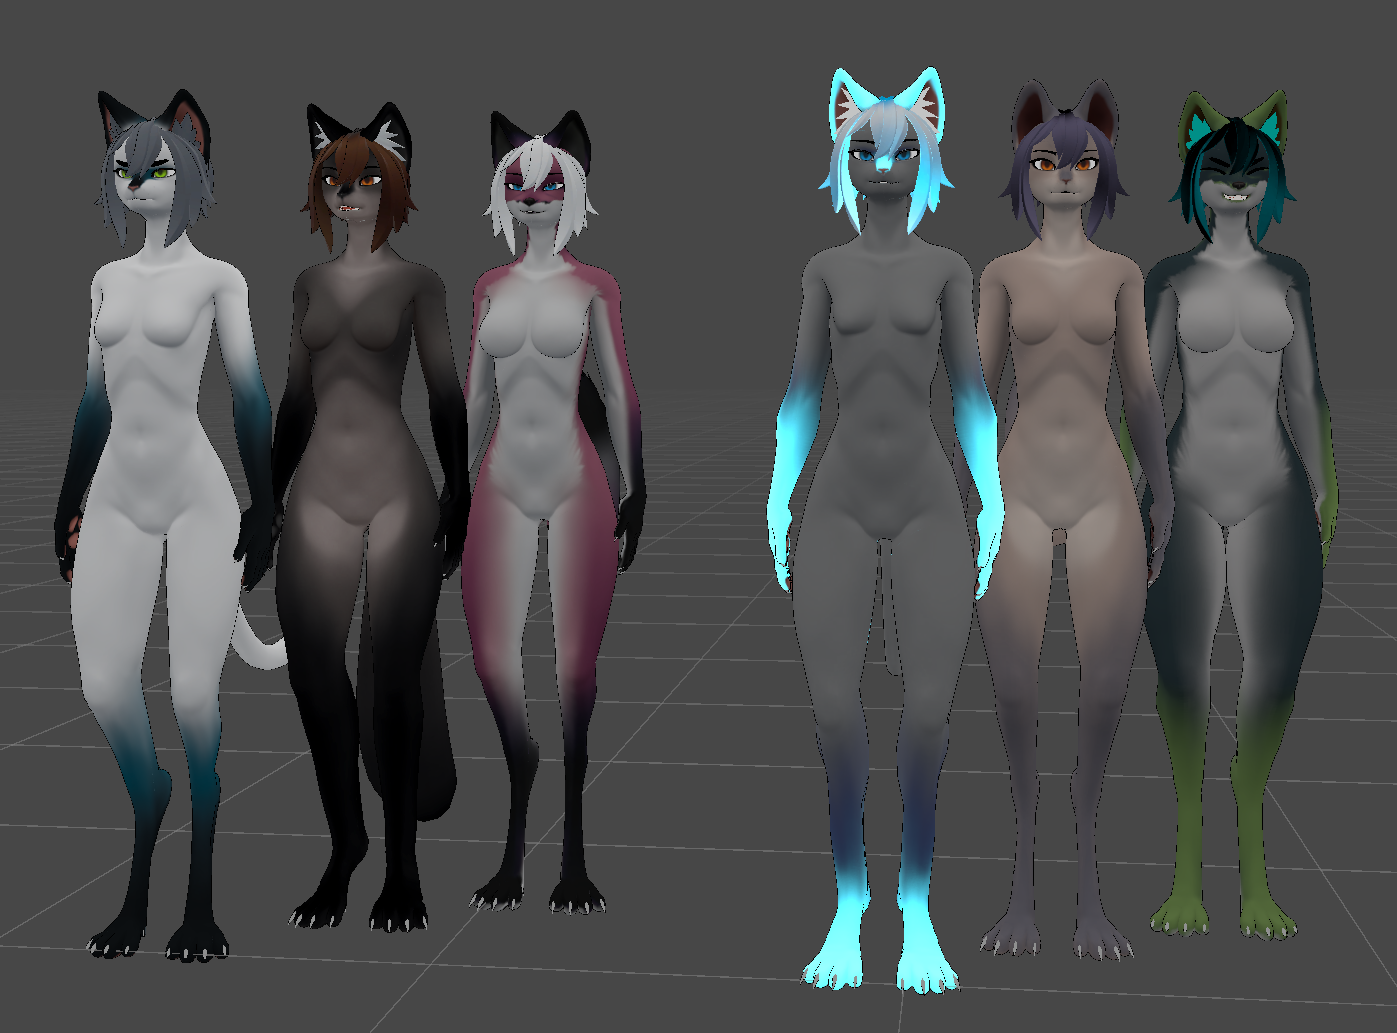
In-unityUsing the RGBA Masks

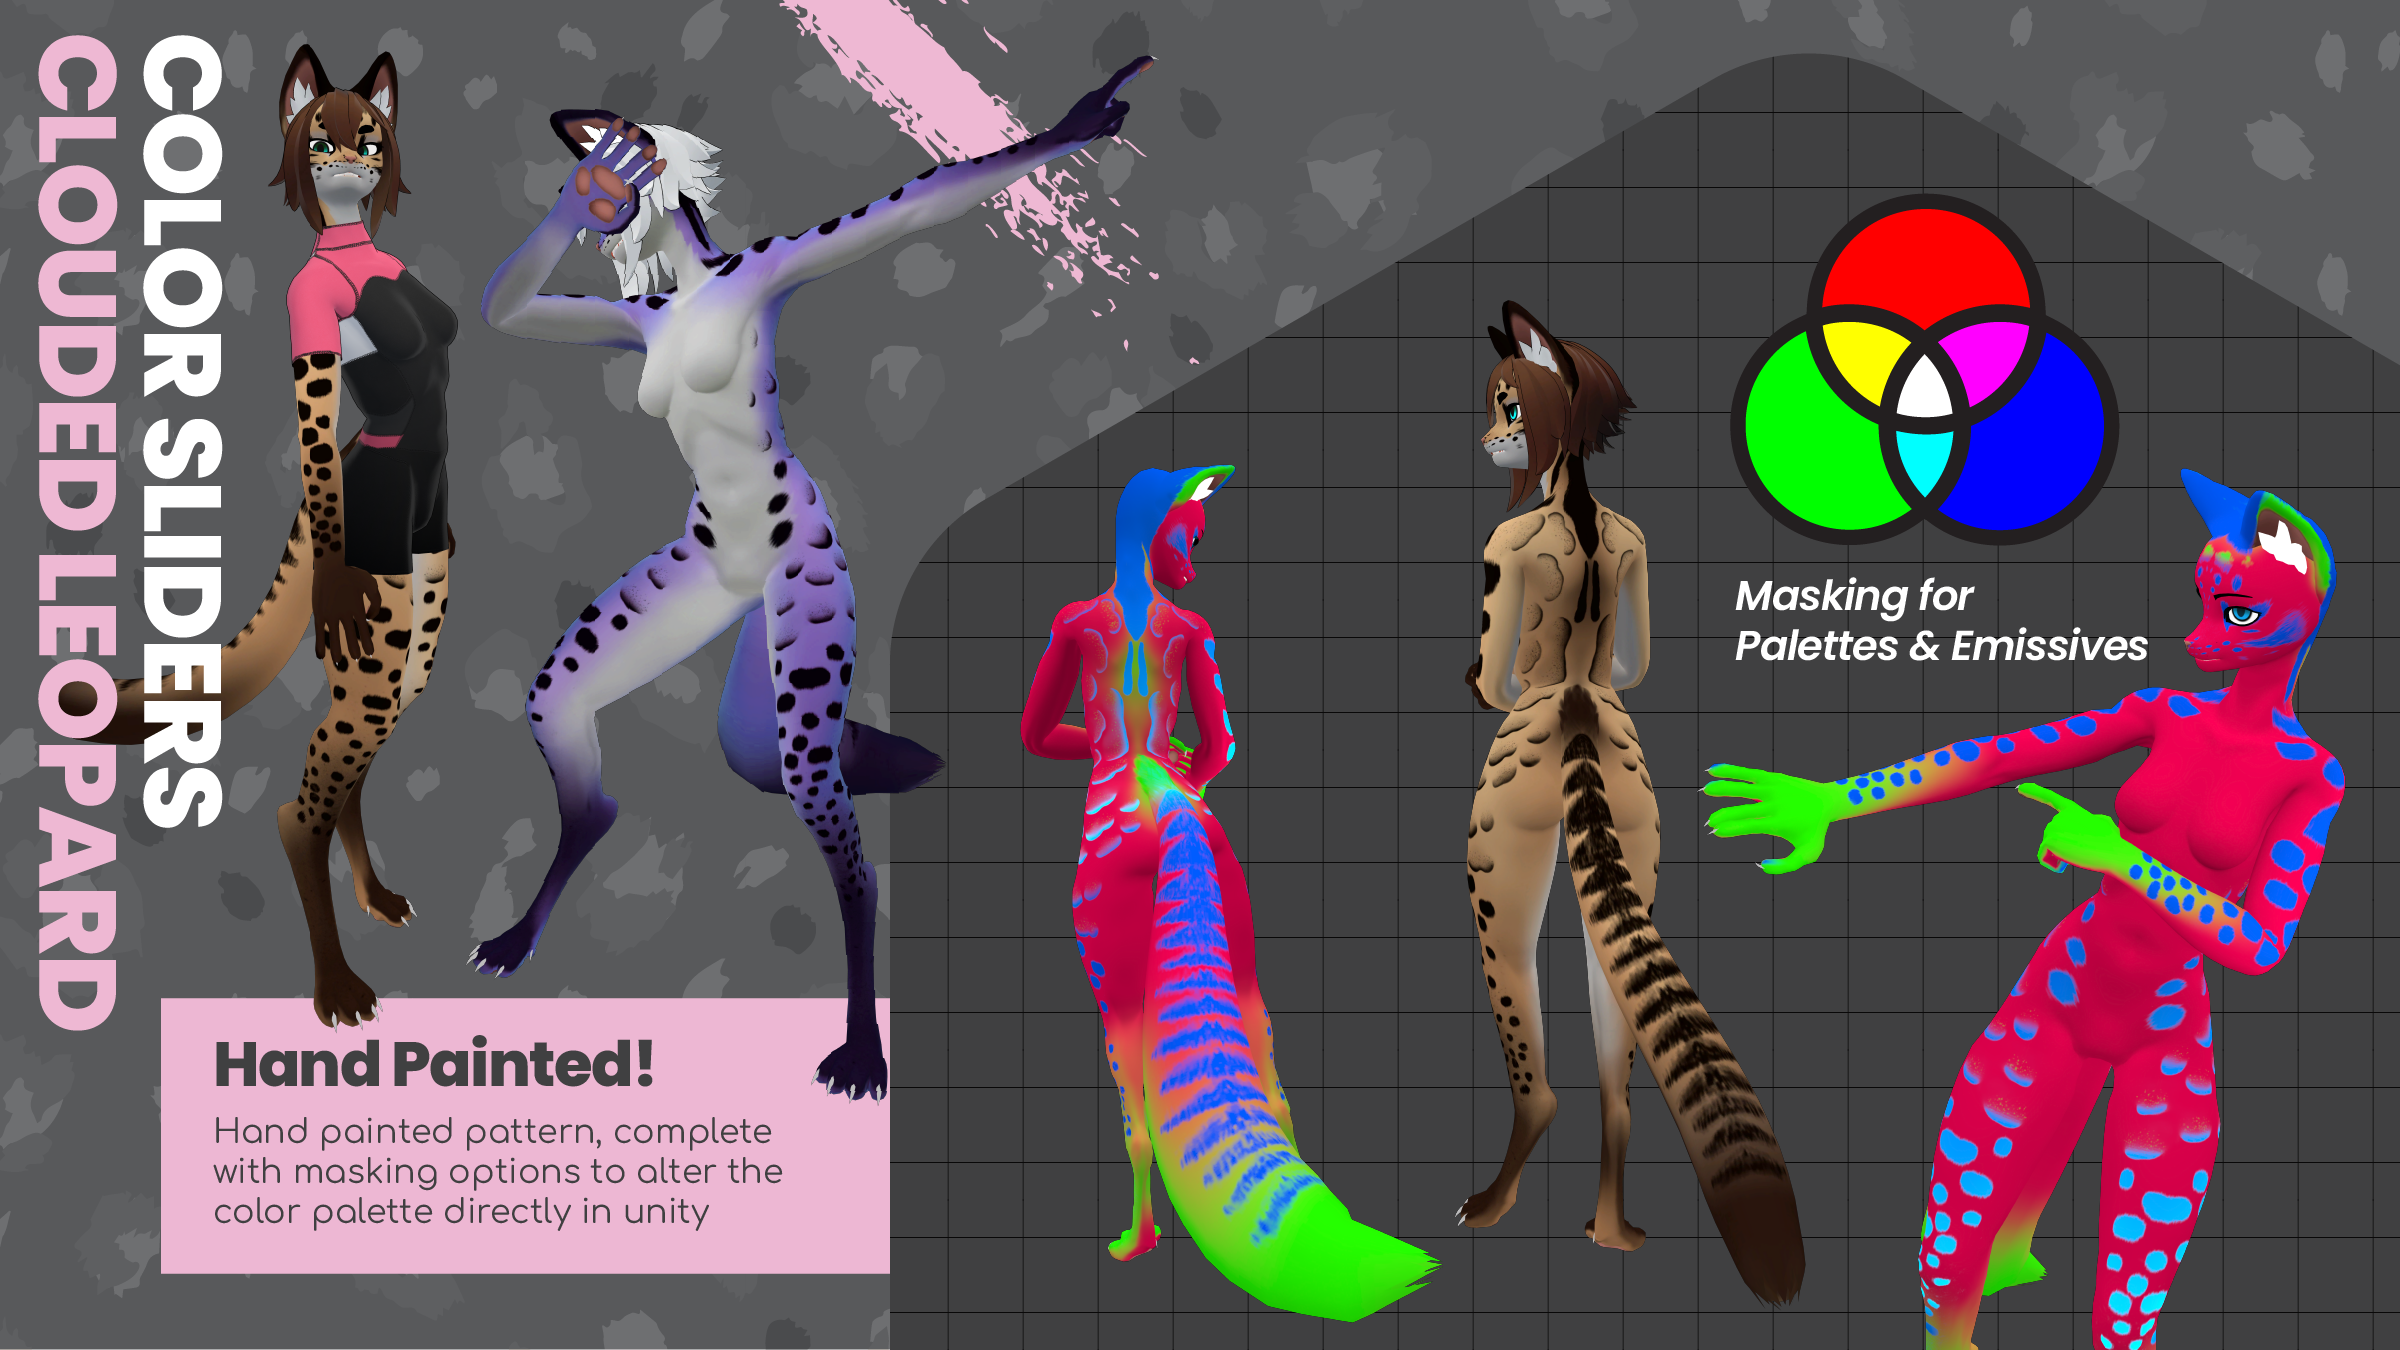
In each pattern’s material folder, you’ll find the stock material, then ‘HUE’, and ‘RGB’. In the demo ‘Vixine’ scene, you’ll see these materials with preset adjustments on the sets of trios to the right. (Pictured: HUE trio)

These work by masking the default texture inside Poiyomi (via Decal layer 0, 1, and 2), and focus on using the Hue slider within each decal to adjust parts of the pattern. You can use the color input (set to white by default) to add saturation where necessary, but should focus on the hue slider. This material style will retain the light/dark balance of the original skins, along with some subtle tone shifting within each color. [Visual Instructions]

The RGB materials use the same masking, but are applied on top of a blank white skin. This allows you to pick the exact color for each color segment via the color box! This does, however, come at the cost of losing a bit of  the tone control from the original patterns. Note that Mono HUE uses an emissive layer as well, which should be disabled if you don’t intend on using it.

Final note, as indicated in the visual instructions above, Decal 3 is also part of this system, but only relevant if you’re using NSFW toggles. For more information, visit the OSHA page.

SubstancePreferred

//USING THE PROVIDED SUBSTANCE FILE

As noted in the introduction, this file will likely require a current Adobe subscription for Substance (which is $20/month, independent of the full CC subscription. Rude).

The substance file uses a named file structure, which should give you all the building blocks you need to construct your own design. For best visual representation of the model in its intended Poiyomi coloration while editing, change the dropdown at the top right of your 3D view from “Material” to “Base Color”.

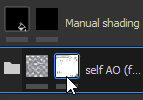
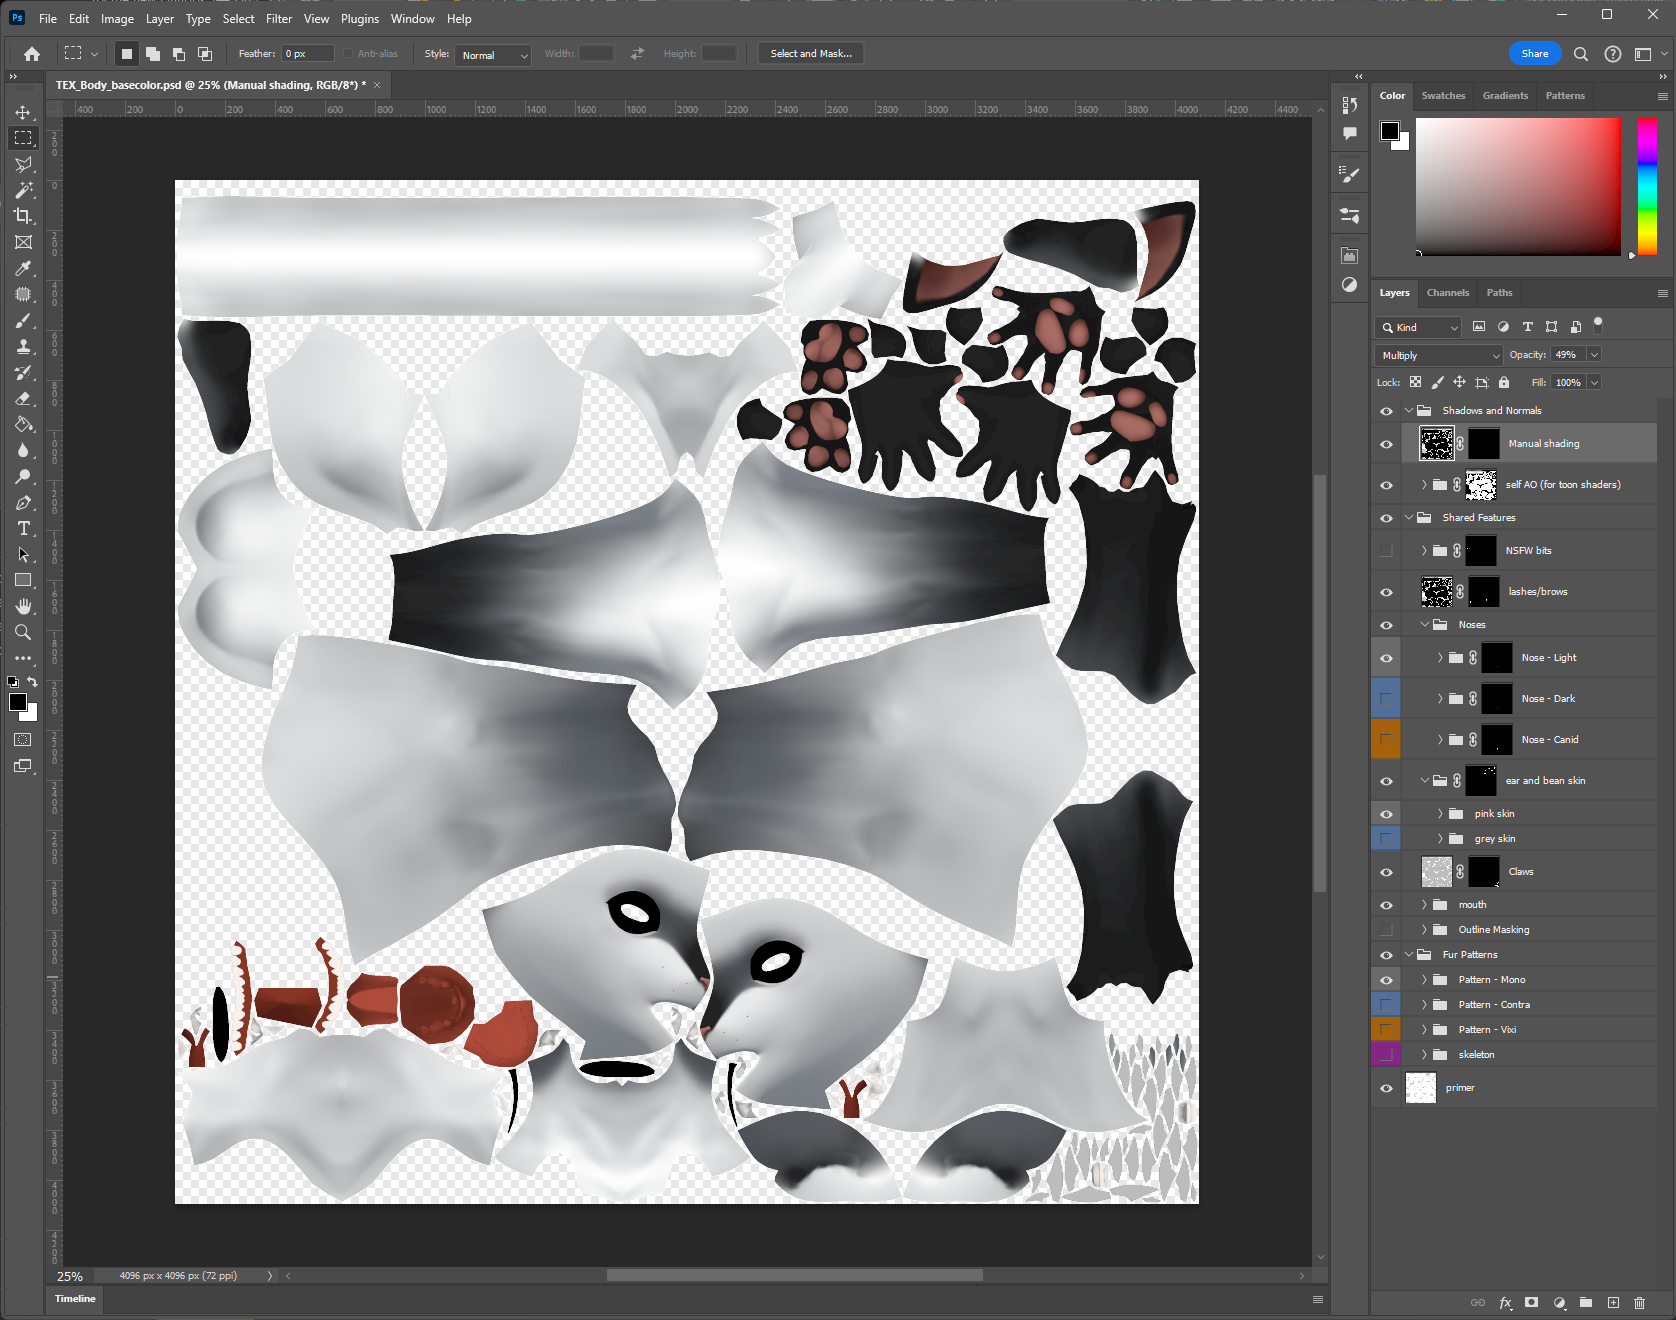
Shadows and Normals – This provides the natural shading to the body. If you wish to add extra shading, you may paint white on the black mask of ‘manual shading’, and If you wish to reduce shading in a given location (for instance, lowering the prominence of the breast shadows for small/no chest users), you should use a very low opacity, soft edged brush to slowly paint black on the white mask of the ‘Self AO’ folder (pictured).

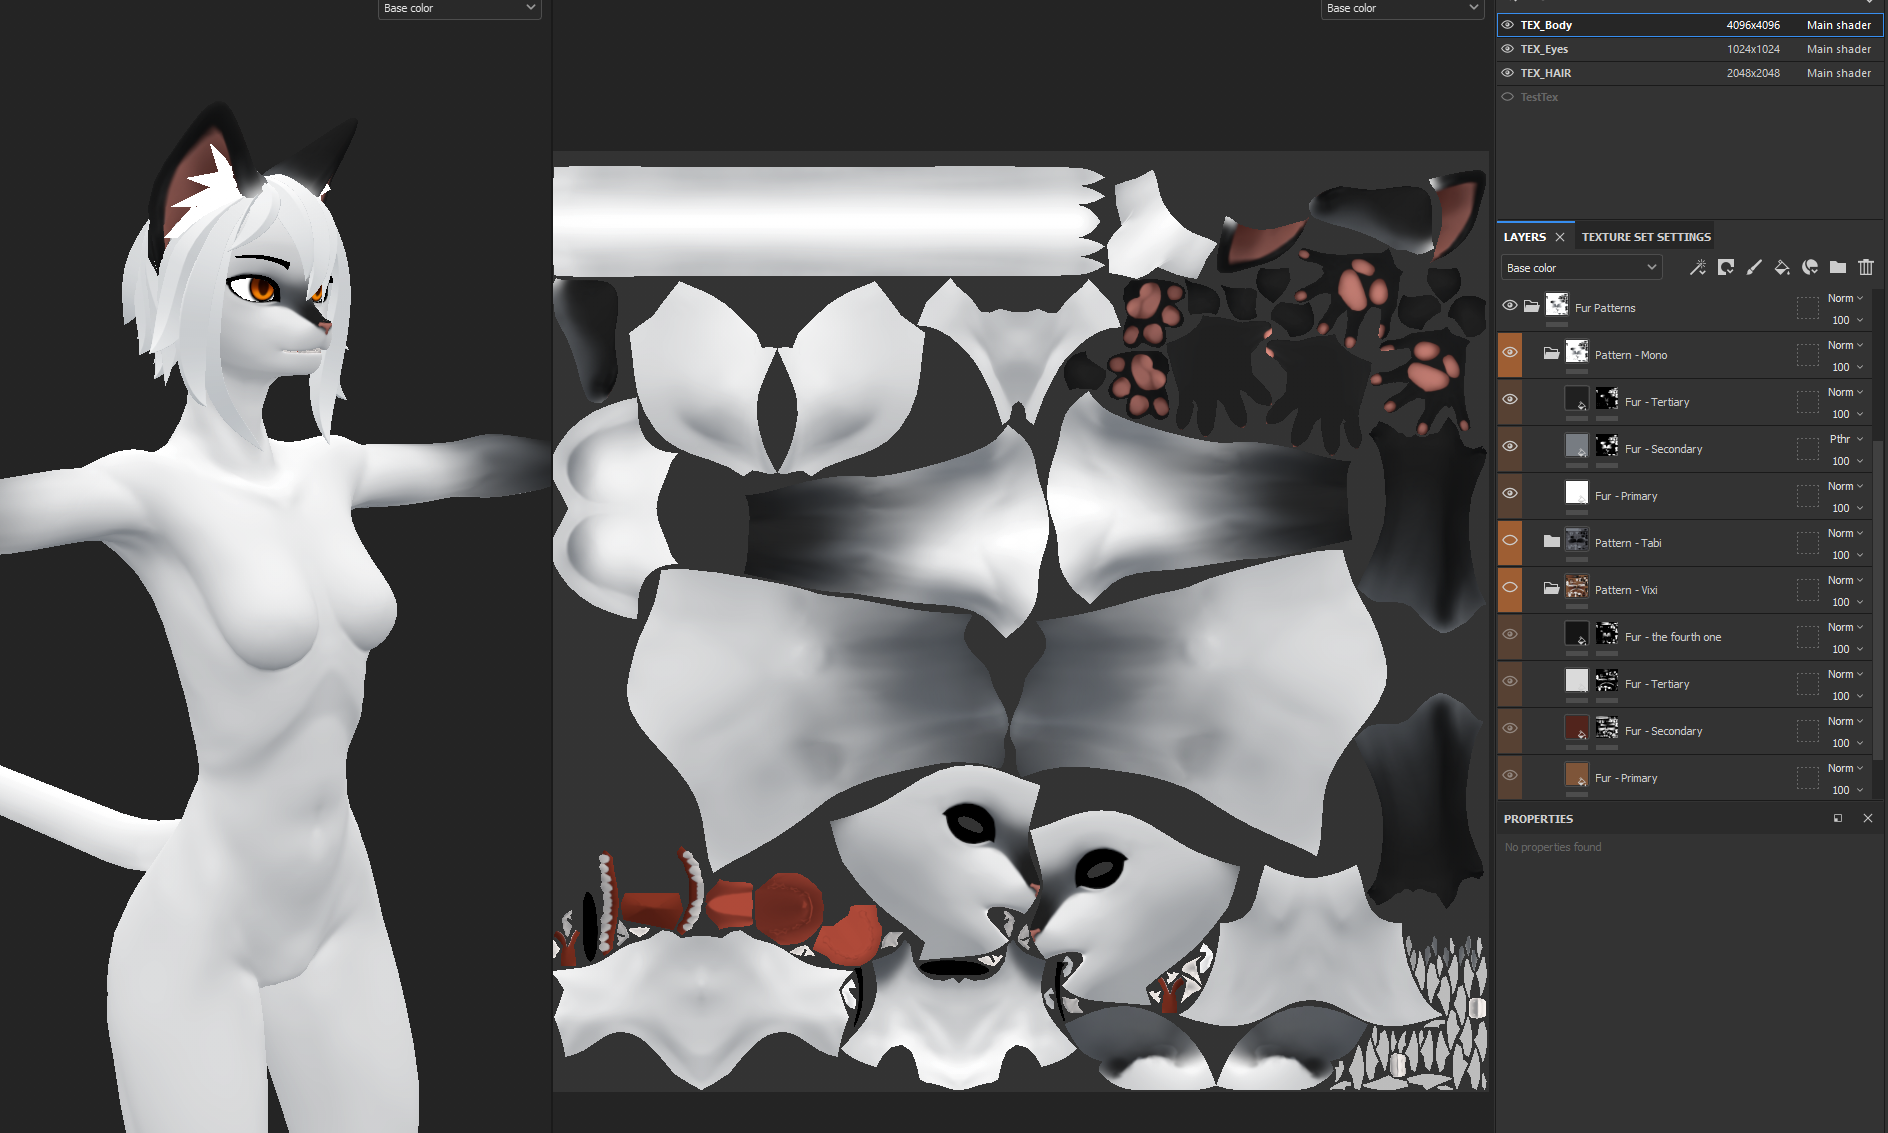
Fur Patterns – And of course, I’ve included the original default textures and how they were painted. They use Fill layers to set the color of that part of the fur, and a mask layer to set where the fur shows. Feel free to use these as starting points by changing the Base Color before painting on these masks, using white to paint it in, and black to erase.

To make the file work a little faster, you should probably delete any fur patterns and shared features you don’t intend on using. Just like optimizing VRAM usage in VRChat, every one of these layers contains a 4k map for the mask and it takes a while to get them all into memory when you first load the file, and bog down your machine while you’re trying to work.

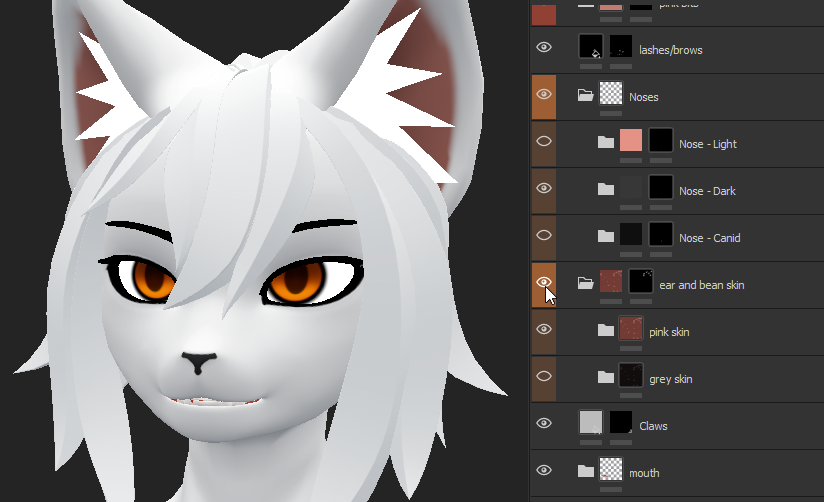
Shared Features – this folder set is for things that are independent of the fur coloration, such as the color of the underlying skin that shows on the ears, pawpads, and nose, the nose’s style, any information controlling the teeth, claws, and mouth skin, and eye lashes. Tweak these as you like!

It should be noted that the ‘Pink Bits’ layer is (of course) for the NSFW system, and are painted with the unique geometry changes in mind. The nipples are aligned specifically for the mesh and should remain in place unless you know what you’re doing when editing the geometry later on! It’s also not meant to be exported on the main texture, but as a transparency with everything else disabled. If you’re going to do renders in blender though, having it all on one texture is probably for the best!

SubstanceIf you have the steam version

//CREATING A NEW SUBSTANCE FILE

Adobe is rude and wants you to abandon the idea of a perpetual license. Don’t give in.

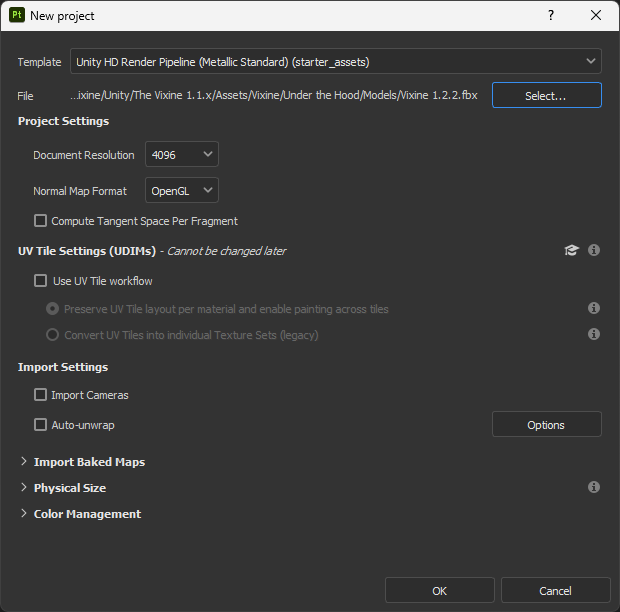
Let’s start from the start- New File, Import the Vixine FBX from your unity file, found in Assets/Vixine/Under the Hood/Models. Follow the import settings you see to the right, 4k is best even if you’re gonna crunch it down afterward.

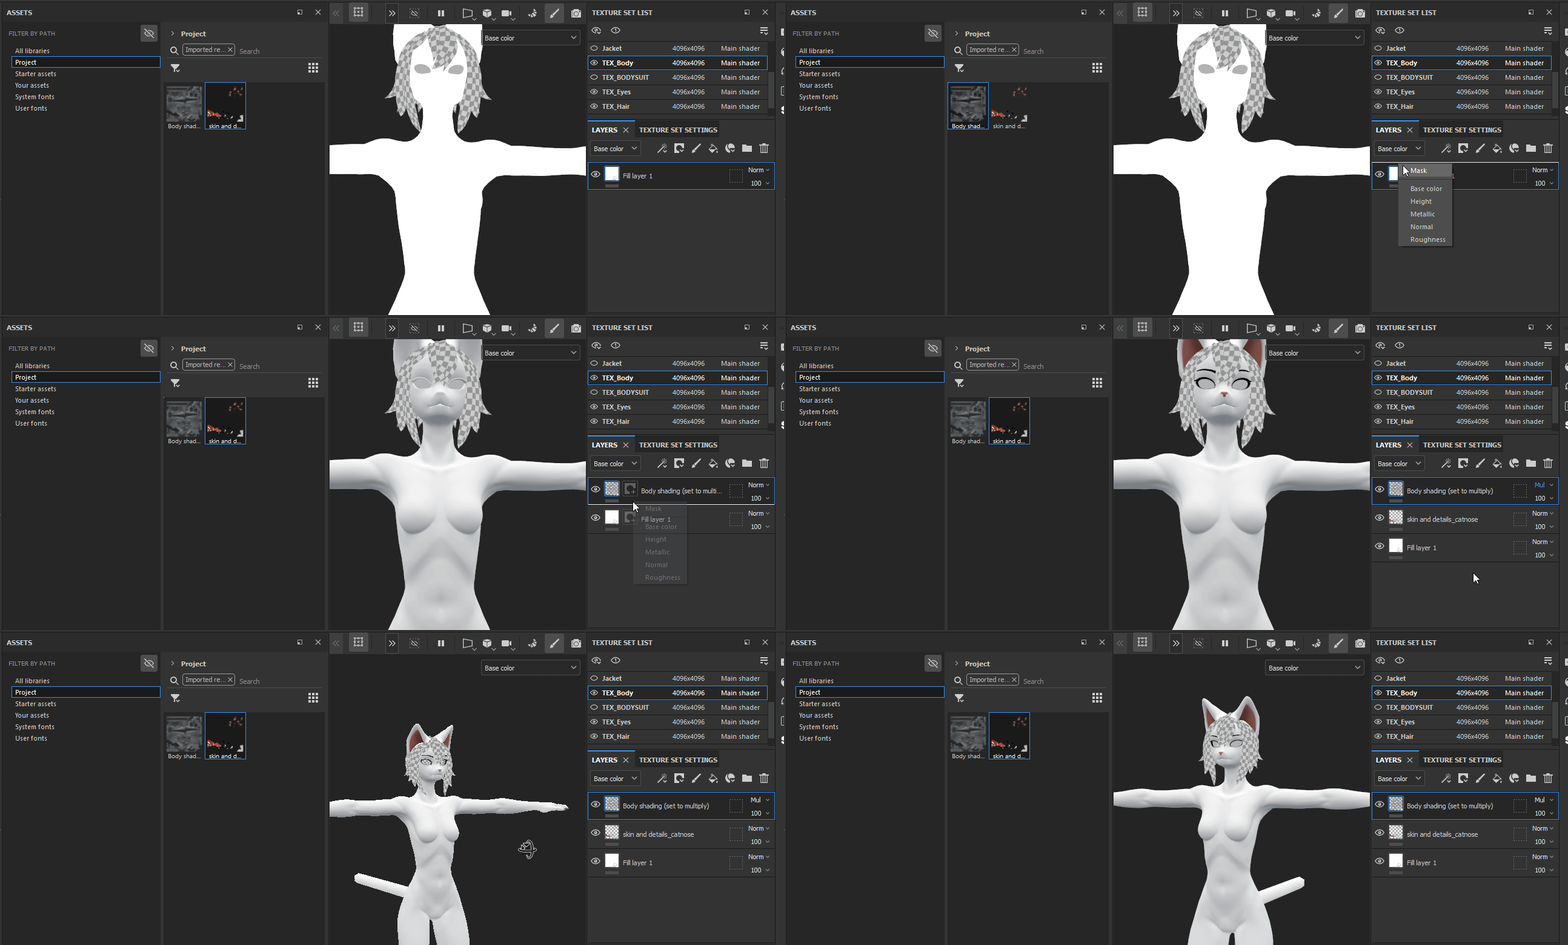
Upon hitting OK, you’ll now be faced with the model, and all of its stock clothing options. Don’t worry about those- hide all but the 3 ‘TEX’ texture sets at the top right so we can work with the body. Also change the nearby dropdown from ‘Material’ to ‘Base Color’, if you’re going to be working toward the same semi-toon-shaded look that comes with the model. (If you know what you’re doing beyond that, go ham).

Select the TEX_Body texture set at the top right, then in layers, delete the default blank one. We’re going to click the paint bucket above the layer space, this adds a ‘fill layer’, aka “use one color here”. Make it white, and we’re done.

After that, open your assets window if it isn’t already, and we’re going to drag your new textures into the layers manager, as new layers (shown on the right).

At this point, you’re ready to hit the ground running, and can refer to the previous substance section. You may find more textures to work with around the body textures folder, and all of these are backed up in a zip file in the ‘work files’ downloads toward the bottom of the vixine’s gumroad download page.

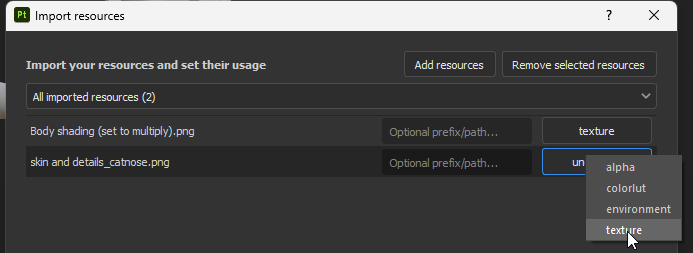
Starting out- we’re going to import some files into your project’s assets. Hit File>Import Resources, hit the ‘add resources’ button at the top of the new window, then head on down to Assets/Vixine/Materials/Body Materials/!Parts Kit. We just want two files: “Body Shading (set to multiply)” and “skin and details catnose”. Select both, hit ‘open’, then in the main import window, change them both from ‘unknown’ to ‘texture. At the bottom, make sure it’s importing to ‘project’ (it will show the name of the project. If you haven’t saved it, it says that unity pipeline standard thing from the template earlier).

ALRIGHT, now it’s time to party

PhotoshopMore work, less precise

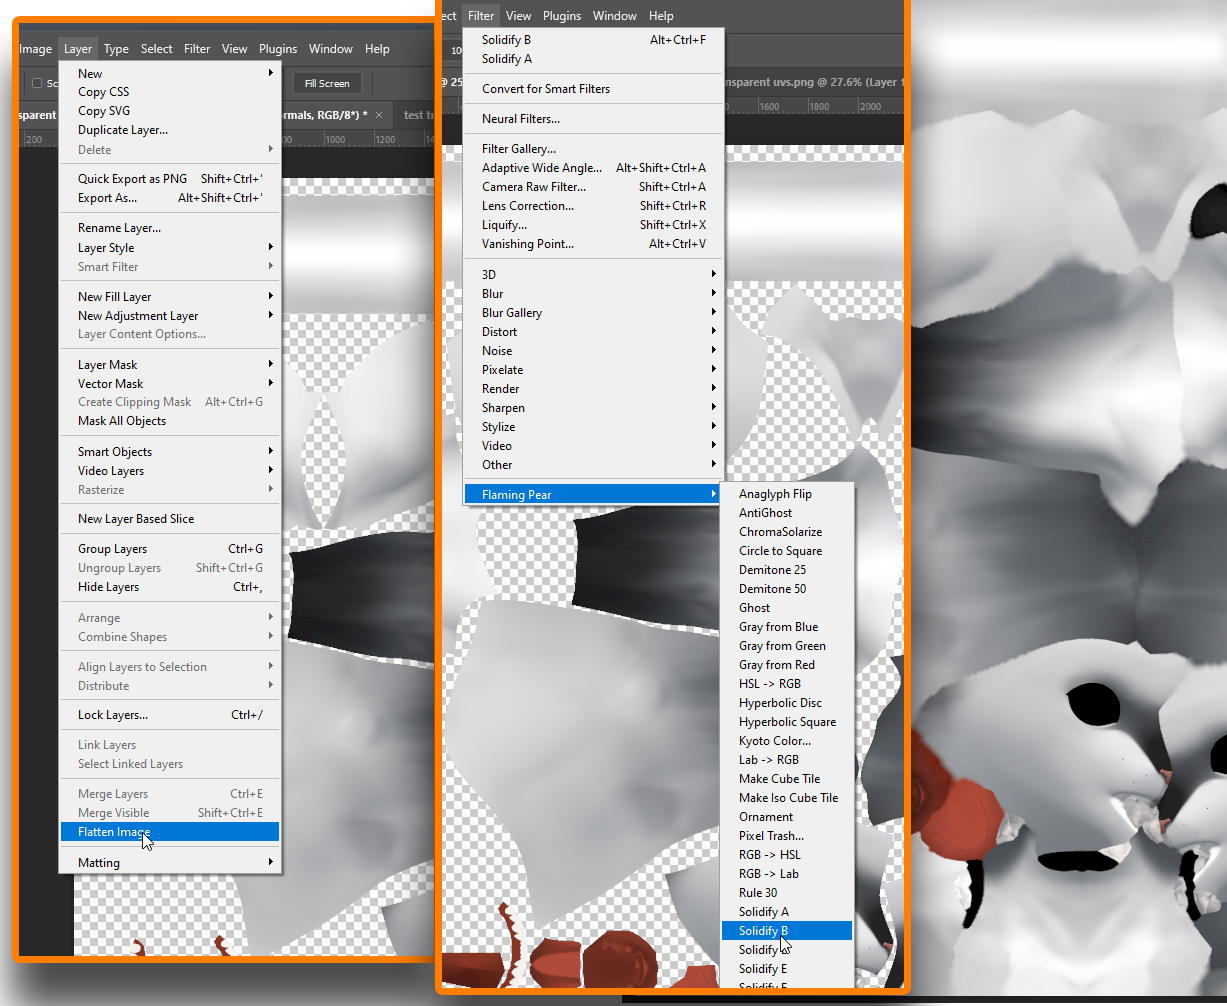
The process at this point is to flatten your image so it becomes a single layer, then under filters, go down to ‘flaming pear’ and choose one of the ‘Solidify’ filters. This will fill in all of the blank padding space with nearby color, in different styles. B worked out pretty well the last time I tried this, even though it looks a little warbly around the edges.

As a back-up plan, I’ve exported the Substance file, structure and all, as a PSD and included it in the workfile downloads.

This works the same as the Substance explanation above, with the caveat that you cannot, unfortunately, paint on a 3D model, and will have trouble aligning details that cross over UV seams. Please consider this a last resort if you have anything more detailed than a palette swap in mind!

If you wish to set up a cleaner, simple photoshop file, you can also create one by combining the various blank file parts in your unity project, found under Assets/Materials/Body Materials/!Parts Kit.

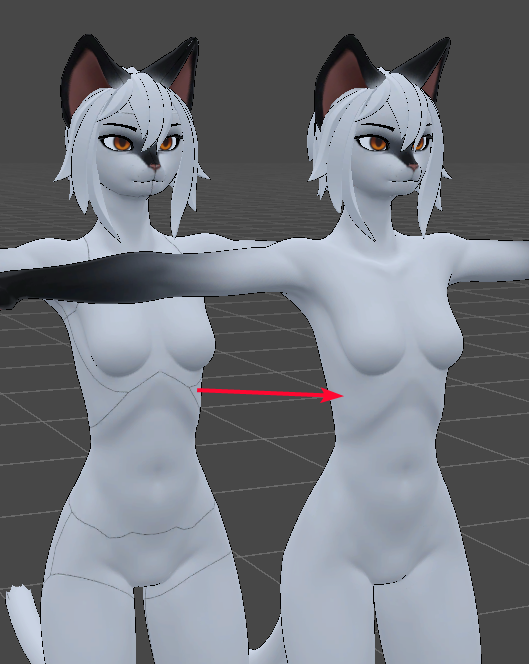
Once you’re done editing, you’ll be required to use a free plugin to finalize the texture correctly, found here- http://flamingpear.com/free-trials.html#freebies. The reason for this is, if you leave the background padding transparent, it will show some ugly seams on your model (seen to the left)

Once you have the download, drop all of the files into program files/adobe/adobe photoshop 2024/plug-ins/, and restart photoshop if it was open. Save your PSD first, just to be safe!

Substance + RGBACreating Masks for your own skins!

So, you’re a creator looking to add some extra spice to your textures? SWEET

Using the current version of the substance files, you should notice some new data channels on any given layer- RGB R, RGB G, RGB B. These, of course, represent the 3 different masks that will correlate to Decal 0, 1, and 2 as described in the Unity RGBA mask section at the top.

All you need to do (if you didn’t start a new file from scratch, details further below*) is to assign these to each of your color layers, with a few things in mind- these layers operate from bottom to top, just like in photoshop.

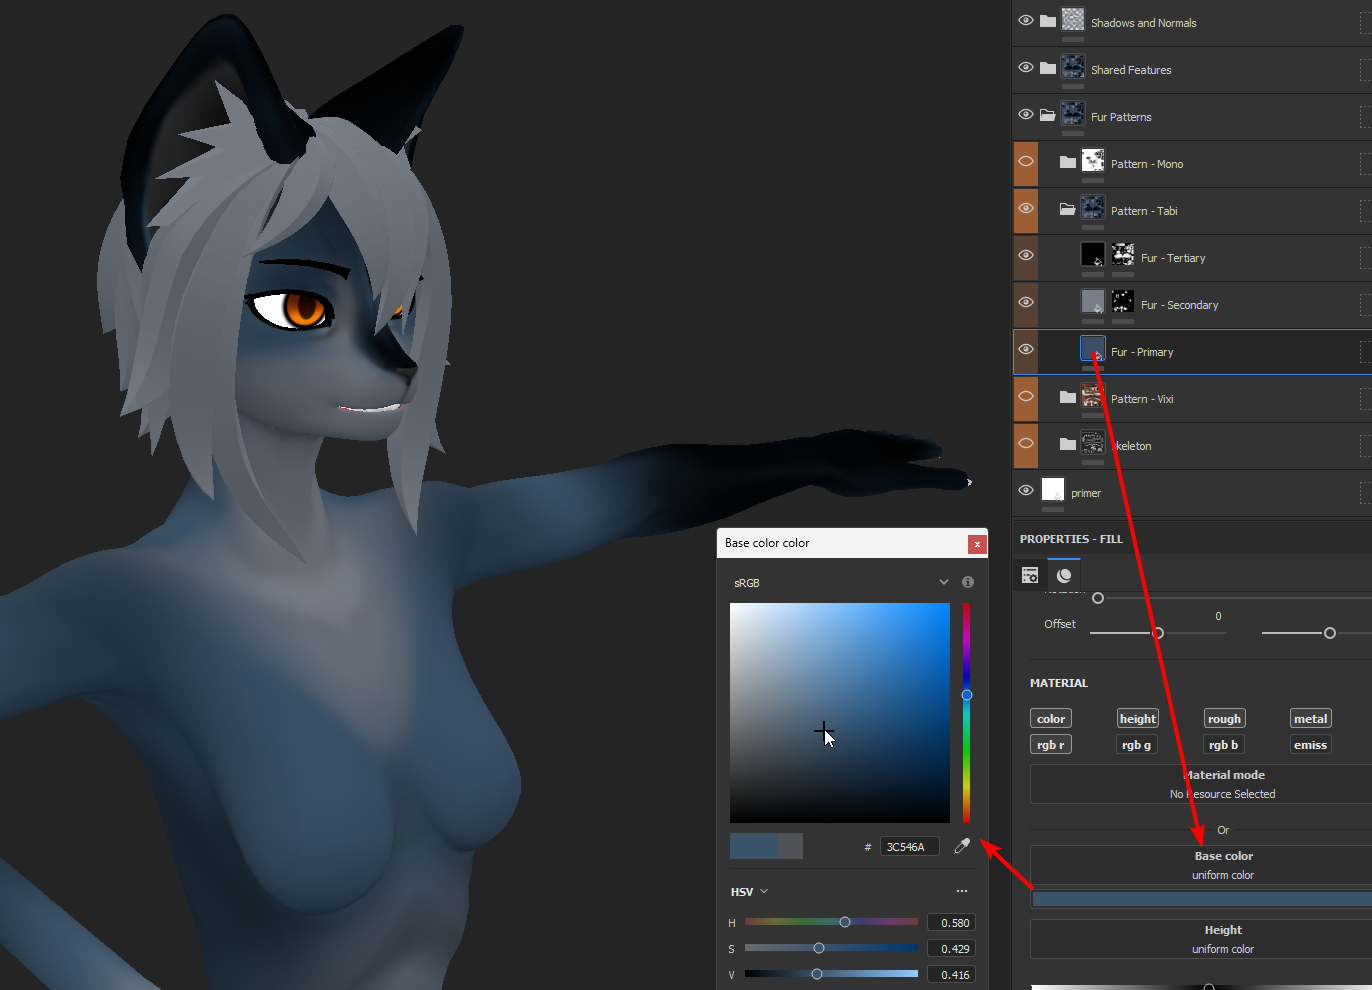
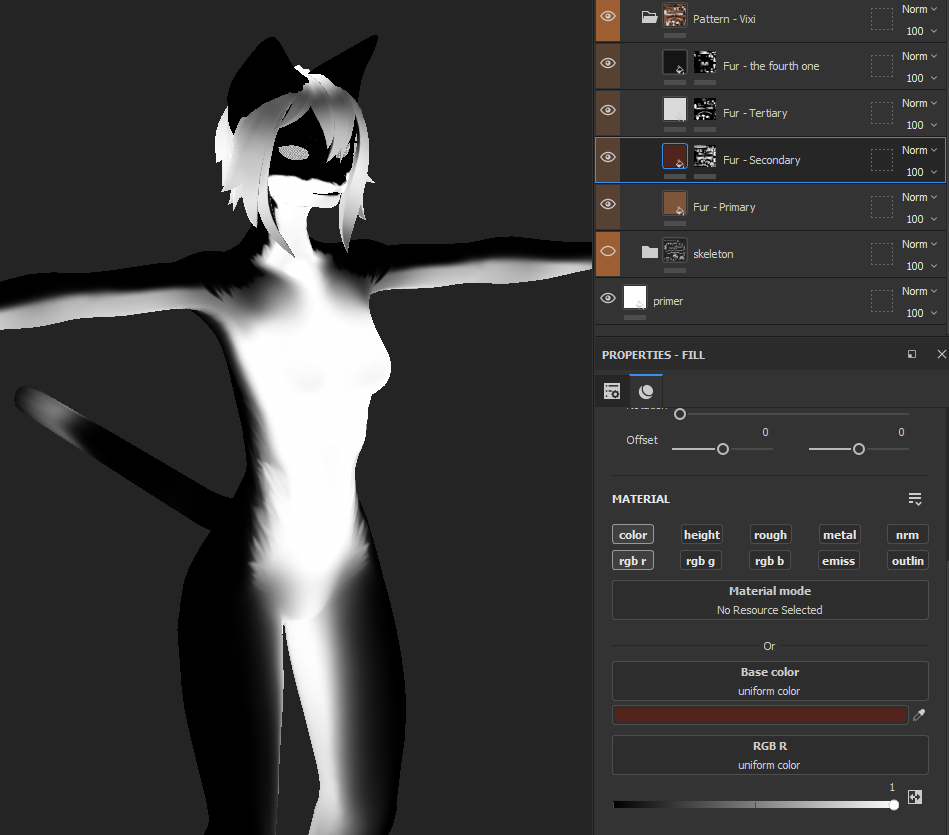
Create an empty layer beneath the others, with just all 3 RGB channels turned on, with no other data enabled. Set all 3 sliders to 0, creating a black base layer for the RGB masking. In the provided substance file, this is all handled by the ‘Primer’ layer.

After that, enable the relevant data layer on each of your fur pattern segments, and set it to 1. You’re stuck with 3 decals for this color adjustment method, so you may need to set several layers to use one mask, or disclude others.

To inspect your masks, you can use the dropdown at the top right, and change from Base Color to the RGB channel you wish to see. You might notice that your masks may have overlap. This may be acceptable for cool blending on RGB style masks, but may cause issues for the HUE style adjustments. If this is happening, consider adding *all 3 masks* on each color layer, and set the value of the two masks that you don’t want to show through to 0, so one layer completely blacks out anything it paints on top of.

*Regarding creating a new file from scratch, or working with an older version of the substance file- You will want to go to the ‘Texture Set Settings’ tab next to Layers, and click the +. Create new ‘L32F’ layers and name them as you like, but take note of which one is “user 0, user 1, user 2” etc.

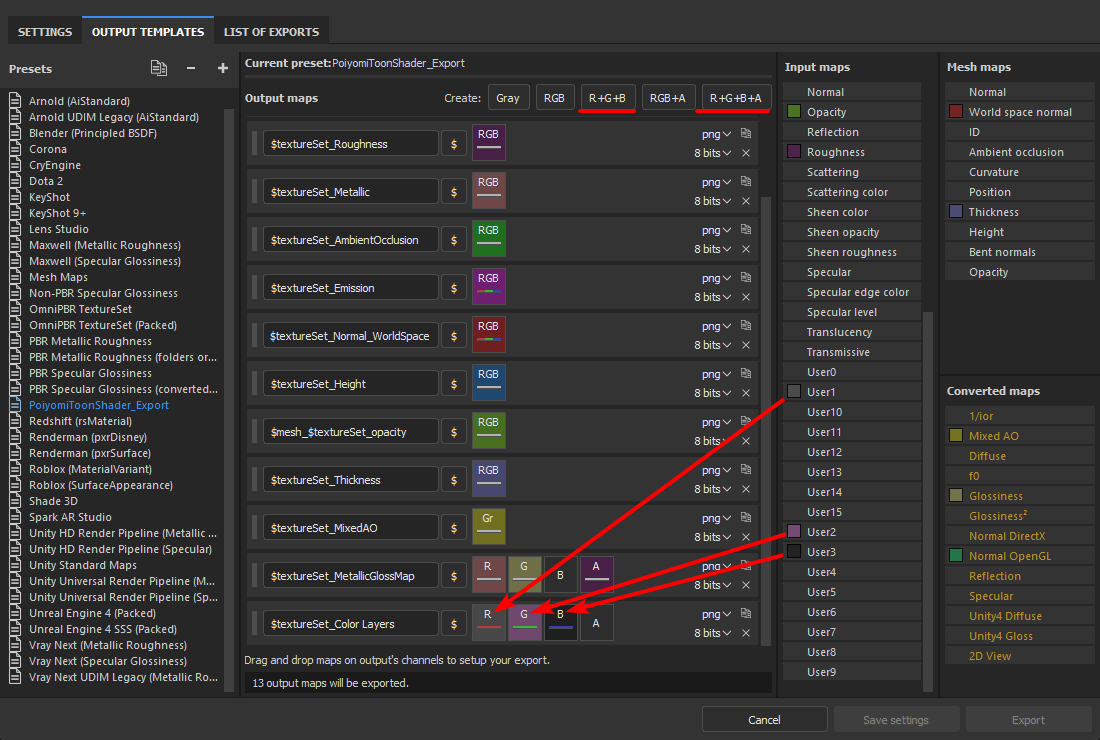
On to exporting- If the file doesn’t bring its export settings with it, or you’re in a new file and set up your own RGBA channels, you’ll need to create a new item in your chosen export preset. Select an R+G+B or R+G+B+A export, and drag the appropriate user field to R, G, and B, as shown to the left

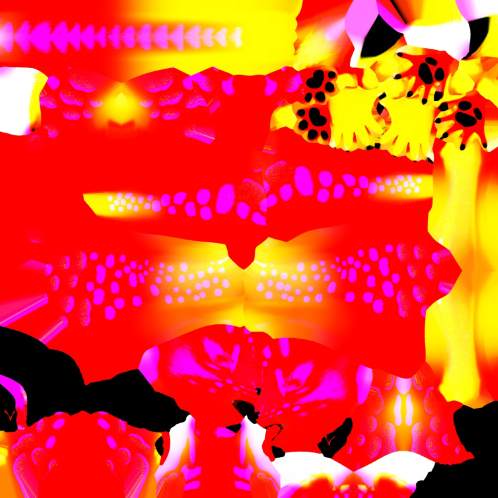
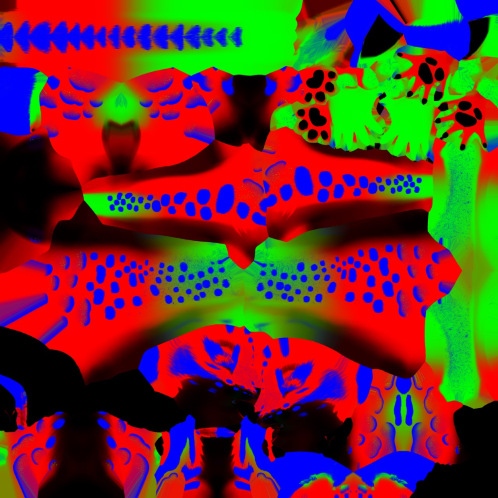
Once exported, you should now see an eye-burning texture in your output location. Referring back to the earlier part about whether color channels are overlapping, you’ll notice lots of yellow and pink when there are overlaps (in which you only added one color channel to set to 1), vs the map appearing mostly red/green/blue if you’ve gone through every layer to set 0’s for channels you don’t want involved in that color

IN BOTH CASES, THE DATA IS STILL THERE. Pink isn’t the wrong color, for instance, it just means there’s 1.0 on the red data channel, and 1.0 on the blue. We’re just dealing with information at this point, and ideally this arms you with the knowledge to fine tune your final output!

At this point, simply duplicate a HUE and RGB material from the presets that came with the Vix, and replace textures as needed. The mask goes into a slot at the top of the decals slot. Consider replacing the default skeleton in Emissive 3 with your mask, selecting the color you want to glow. Really fun when spots and stripes have a little surprise luminescence!

beforeafter

You're Done!

Yeehaw!

If you have any questions, come say hi in the discord!
Take me there